Oasis Student Information Systems > Help Desk > Knowledgebase

Search help:


Article 135: How Do I Create Form Fields for Custom Forms?

Solution

-4j85--obykZX9TDRFZs5AAaprIm_53i6euc5VS8OQvheDFXoWwhTV6rVWf0ePnYLTRtGWx1XQjTb_srRYy0AlitKQXZ5gi5k25QKFs2_opzBFq6rHf4iO6WXWZrwauhkGGs-T1vey74Kh8LV7fYNpM


Custom Forms Module
Knowledge Base 2.0 article 135


How Do I Create Form Fields for Custom Forms?


Navigation Path
< Module> → Custom Forms → Forms Builder (v5)→ Form Field Directory→ Add field→ Edit field


You will have the  ability to create “fields “ for your custom forms.  You will find this option in any of the main modules in the drop down menu of the  “Module” tab.GfbdTUW5ZIiTSws_UE0IA0eij2ZPnNqBrj2kOGTb7iirorbSrAUvRBG0nAX7MobqMRx86cfd9TdieNyVaKNvYWEohiezR5L9DM9qpW759Rq6KUDl9WZjl_sFL2SzL_AZGqyOCSXeZj7rCNCOxoBsOI0


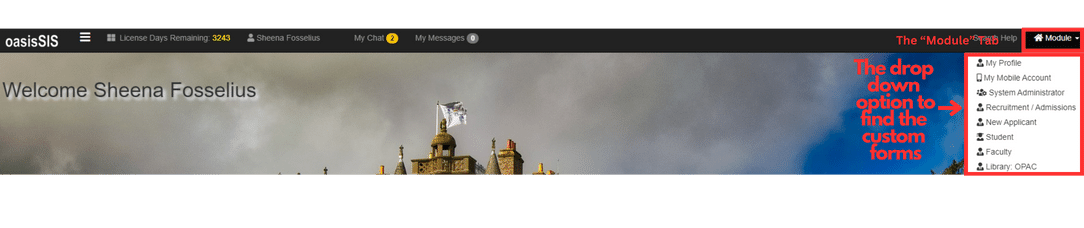
( System Administrator/ Recruitment/Admissions/ Human Resources/ Career Services/ Student Life/ Finance/ Development/ Financial Aid )

From the “Module” Click on “Custom Forms” tab listed on the left side of your screen (Forms Builder (v5)AwA0JwfdffEsPiw-Fo0bkPrJGXADEovTO_GaVBs23or0Pcb_0Lu_4ePfR9KL3aK2OLMJbsjTpe3jsAiIm66eRczmpZZqWXiRg6uoNOQAyywMcAYG-CFHyUZ8eKMPpzJUOauwuwlPd9Q8BPnlh13KRSw

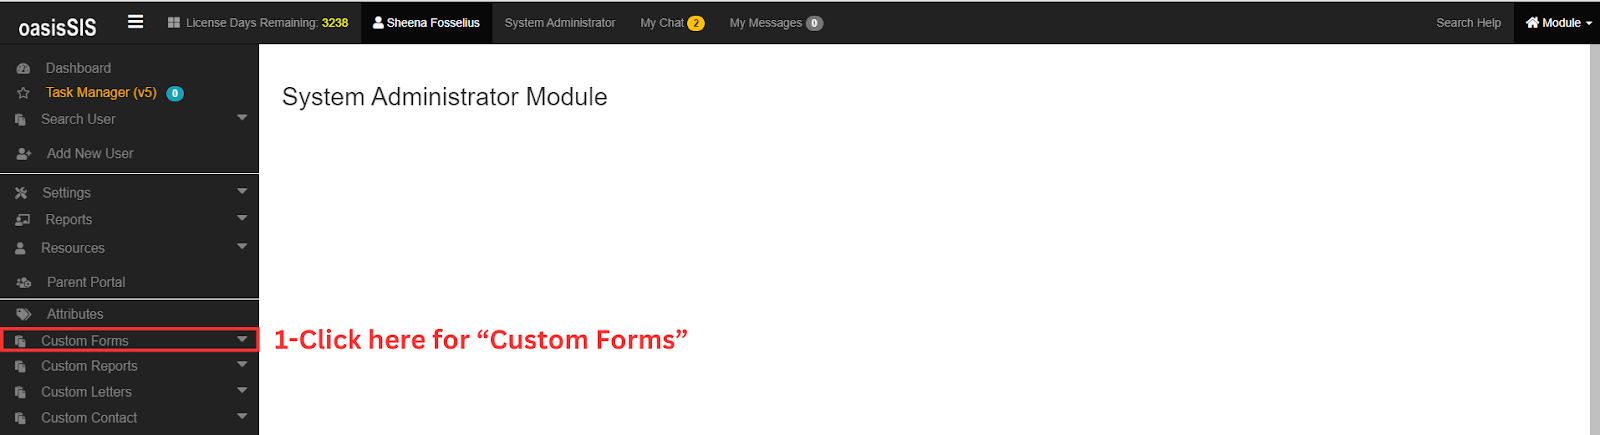
When you click on the “Custom Forms” tab it will take you to a new browser tab. 

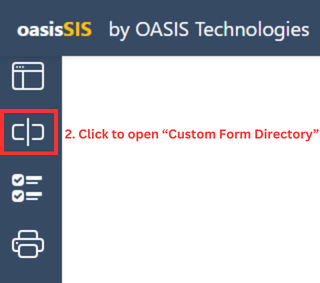
On this new tab, click on the second icon on the left side of the screen. The “Form Field Directory” icon (again this will open another page)

1HSyfa9WeTbvMsDxsPVm2NTugLH8PxNn1nsFcWinv5oALjIMG8nAtrjsHgx07gpNlWP71SdYiaRGzXBDwWraBTA1YjoWX7yg4_qXoVT9od8bq5wwr396zPcTyl0cr990BkVqys8t8nuS-oQE0lrrMaE

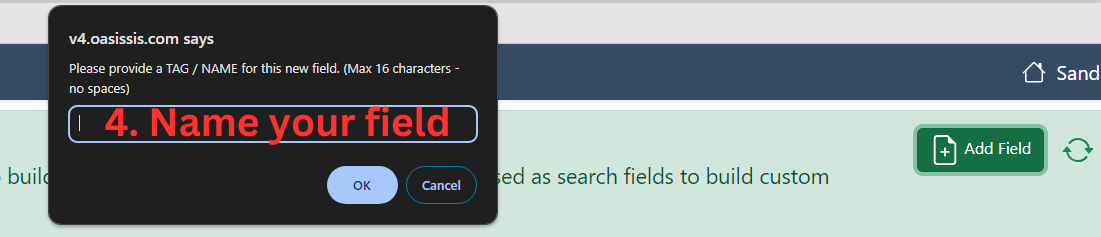
You will land on the “Form Field Directory” dashboard. At the top of the page in a green box with an “Add field” button. Click on the green button to add your field. LT6KzruSOC9c8HmZ_H3VIGj7alp65eZ47qWjmBhhHJD-cgI_oDIFZQdZMsKV-mR4jPbN-kgM4_uYR_eJbnX2b7zhfK1Akeg5azxjVyRva3SQVBksMifwBQQEMXCjzhbwG-9bBODTBITpD_dVAOs5C0o

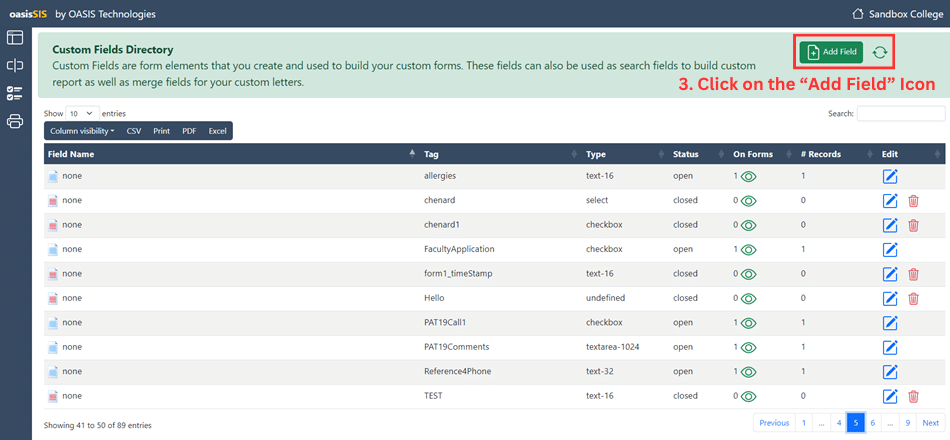
In the pop up window name your field/ make a tag for your “Field Name”

hz1REuknsySo5CfXs6pCoEuVX9a5rR3-CyJ75OIL3mrCr_RYuI_pJZUNSGMOATRYZQzk5gWVoPptfydoAisOXw0-WVLQpeGJ8AMYJXpiwhPGbjjXiF4WoTJN-oR-59BaIRVCxOo6MmorwmbnheDhbNE

After making your tag/ field name, you will scroll through the fields to find the tag you just created. (you will want to look at the tag field spot on the dashboard to locate your file. You can also use the “search box” to enter your tag/field to locate your new field” ) 

After you locate your field. Click on the “Edit” Icon to open the pop up window to edit and your tag. 

m8OaEfkdDIVNNTdb-P1YBdsUxgiPYZRwW41T375YEg6LbPXubH5K2yX5i6a3FydgVXLv8_7phdzM9bWujrR1huq7AB8DCe-dwRBMqLR2uO2OqXzD8doRgiPqUJMyRDUBpe3xCCWQNK-_VvHO1W6wJ5Q

In the pop up window you will answer/ edit information about your “field/ tag” 

  • FIELD TYPE    you choose what the applicant will need to fill in (text, drop down box, number, check box, etc) 

  • FIELD STATUS   is the field open or closed

  • DESCRIPTION   what is the field about, describe your tag/ field (this is also where the “field name” comes from) 

  • PERMISSIONS   who will see and can edit your field 

PKCgGy5DpCBFpkZcSMna1qKqdnNDkWkSdqdH1XlFKicwI49NS37wUWZmREgN4FbTKxcJjOlJv8H8jaB4iy47rc_0S05IC9RW8KdMWuhCFwCthsT3hf4R1F9mvf9b3cbwUAeev3Vq9BKW3CIcnEWQcaQ

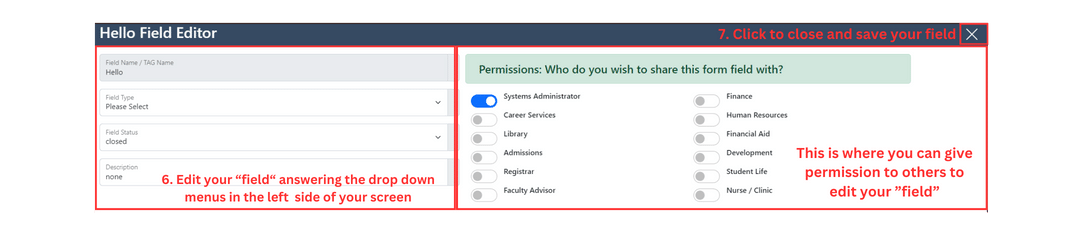
When you are completely finished editing your field, close the window by clicking the “X” in the upper right corner.  ( Your answers are saved automatically when closing this window. Closing this window will take you back to the “Custom Field Directory” dashboard)

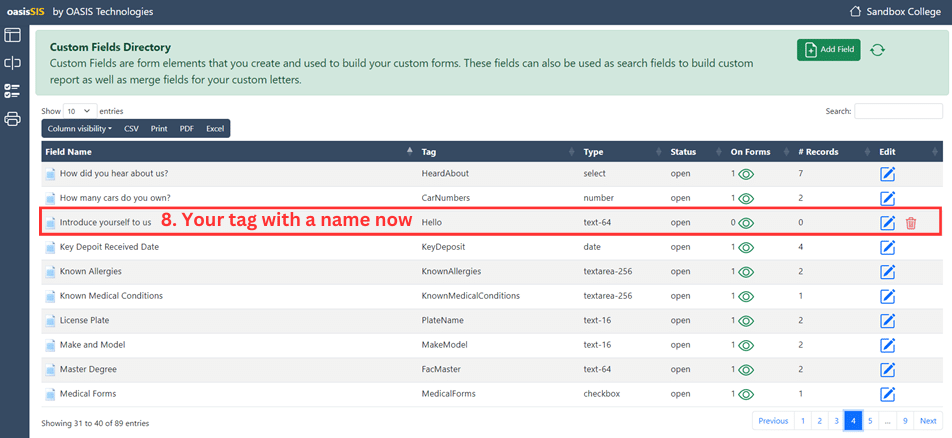
Back on the “Custom Field Directory” Dashboard you will see that your “tag/ field” will now have a name.  (The fields will be listed in alphabetical order on the dashboard.)  

Sob6B4qcHvlFikIP5-t1iYyzhPif_NKCpQxqGp9jVCTGS2sZRelqXQUfTr5Ez7r94ge9uWvYEkTbfJn5aQ2tw9PJqhi2Qwctiu7JdqPicaHsCFIq6A2f0PyA66G2wrLlEW3w-hoNiHvsyJX6G5RxCY0


Was this article helpful? yes / no
Related articles Article 136: How Do I Create A Custom Form?
Article 569: How Do I Add "Images" To My Survey?
Help Fund Me: Student Manual
Article 572: How Do I Add A Survey Question ?
Article 557: How Do I Add a "New User"?
Article details
Article ID: 135
Category: Custom Forms
Rating (Votes): Article not rated yet (0)

 
« Go back

 
Powered by Help Desk Software HESK, brought to you by SysAid